Hip clicking in Pilates Leg Circles? . . .
. . . Could it be from a tight pelvic floor?
Or from a “stuck” foot arch? Or both?
Whatever the source, we know the pesky sound of hip clicking in Leg Circles (or other Pilates exercises) means the femoral head is poorly positioned in the hip socket.
We also know that this will have negative knock-on effects either at the pelvic floor or at the foot (or both).
That’s because the pelvic floor is intimately related to the hip. And, the hip is intimately related to the foot.

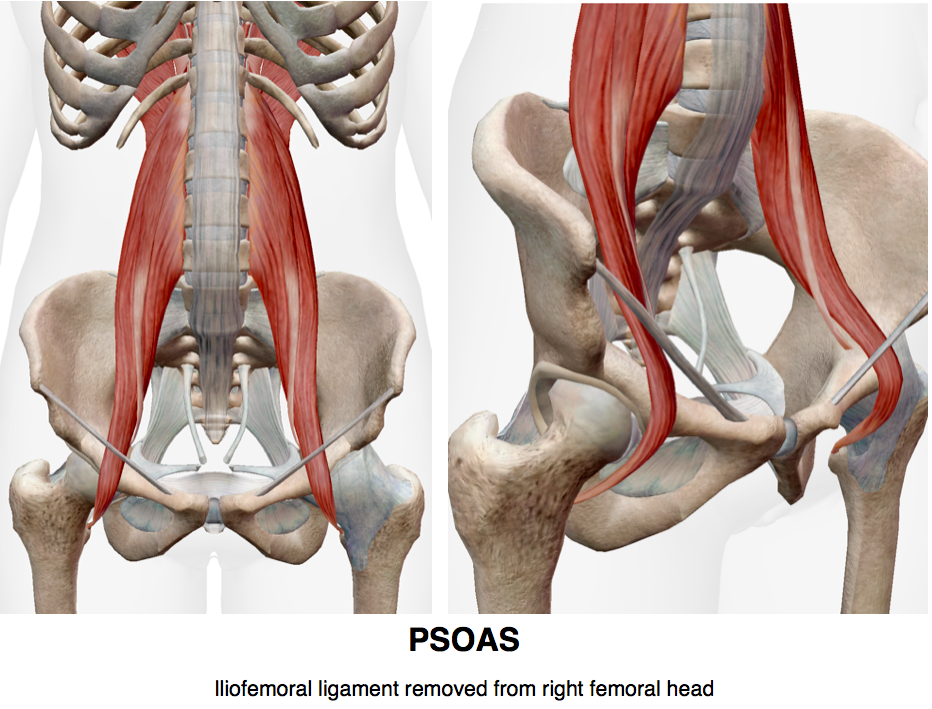
Compressed inferior, posterior pelvic tissue from repetitive Pilates “feet in V,” “wrapping the thighs,” or “squeezing the glutes,” or even from an habitual tucked-pelvis posture can push the head of the femur forward in the acetabulum (socket).
When this is combined with a tight psoas, the psoas may “rub over” the forward part of the femoral head, or its bursa, when circling the leg. Hence, the click.
 What causes psoas tightness? Practice or posture.
Using it as your main hip flexor will make it tight but so will sitting all day +/or living in an extension “military” posture ➼ chest out and hips tipped forward in an anterior pelvic tilt.
A tight psoas reduces its ability to hold the femoral head in place; one of its many tasks.

Start at the root of the problem: Free the compressed tissue at the back of the hip (posterior pelvic floor, six deep hip external rotators, even gluteus maximus) to allow the femoral head to slide back in the socket to improve femoral-on-pelvic rotation in Leg Circles and avoid the click.
Set Up
Stand with hands on the back of a chair
- Parallel hips, legs + feet hip-width apart
- Weight on all 4 corners of the feet
- 1st + 5th metatarsal heads (met heads)
- Inner + outer heels
- Inner + outer heels
- 1st + 5th metatarsal heads (met heads)
- Weight on all 4 corners of the feet
- At the same time, simultaneously do the following actions:
- Hinge trunk forward
- Open the sit bones
- Open the sit bones
- Align the manubrio-sternal joint with the pubis
- Do not arch the back
- Neutral pelvis
- Neutral spine
- Neutral pelvis
- Do not arch the back
- Bend knees 20° shifting weight a bit more forward (photo 1 below)
- Hinge trunk forward

- Then, slide left foot slightly back, heel up, ankle in plantar flexion (photo 2 above)
- Keep the side ribs “long”
- FEMURS + KNEES STAY PARALLEL + FORWARD
- Keep the side ribs “long”
Action 1 / Hip Internal Rotation (photo 1 below)
- Reach left knee down toward the floor to rotate pelvis + trunk to the right
- DO NOT CHANGE BEND OF RIGHT KNEE!
- DO NOT CHANGE BEND OF RIGHT KNEE!
- Press through 5th met head + outer heel of the standing foor to rotate to original position
- DO NOT LET RIGHT KNEE WOBBLE SIDE TO SIDE
- DO NOT LET RIGHT KNEE WOBBLE SIDE TO SIDE
- KNEE POINTS STRAIGHT AHEAD

Action 2 / Hip External Rotation (photo 2 above)
- Reach left knee laterally toward the ceiling to rotate pelvis + trunk to the left
- DO NOT CHANGE BEND OF RIGHT KNEE!
- DO NOT CHANGE BEND OF RIGHT KNEE!
- Press through 1st met head + inner heel of the standing foot to rotate to original position
Repeat opposite side

You won’t feel this exercise or reap the benefits if:
- The standing knee wobbles side to side;
- The standing knee straightens; (my right knee should have been more flexed in both rotation photos above!!!)
- The standing hip hikes;
- You lose contact with all 4 corners of the standing foot.

By keeping all constraints in place (4 corners of the foot firmly planted, femurs + knees parallel, un-wobbly standing knee, manubrio-sternal joint aligned with pubis without overarching lumbar spine) and rotating the pelvis on a fixed femoral head we ➽ eccentrically contract / release the compressed tissue at the back of the hip and in the posterior pelvic floor ➽ allow the head of the femur to nestle back in the socket ➽ improve hip range of motion ➽ abolish the cause of hip clicking!

Now try Leg Circles on the Mat.
Keep the standing leg knee slightly flexed to assure the pelvis doesn’t move as you circle the opposite leg: no hip hike in the frontal plane, no ASIS toward the ceiling in the transverse plane.
Keep the head of the femur firmly seated in the acetabulum in neutral when circling.
Reduce your hip ROM to respect this! (Notice I don’t flex my right hip to 90°. Why? I can’t! I don’t have that range!)


Rotating the pelvis toward the standing leg, causes internal rotation at the standing hip. This SHOULD produce a “pronation moment” at the foot: more weight on the inner border + 1st met head, medial arch lowers slightly toward the ground, foot “splays,” lengthens.
Rotating the pelvis away from the standing leg, causes external rotation at the standing hip. This SHOULD produce a “supination moment” at the foot: more weight on the outer border + 5th met head, medial arch lifts slightly off the ground, foot “tightens up,” shortens.
BUT for this to work well, we must keep contact with all 4 corners of the foot on the floor throughout the exercise.
If the foot has trouble finding these different “moments,” there’s a good chance hip mobility will be negatively affected.

A healthy pelvic floor depends on healthy hips that move through all ranges of motion.
Important pelvic floor muscles originate in the fascia of the obturator internus ➼ one of the hip’s deep 6 external rotators. Tightness in these external rotators (very common in Pilates . . . see above) automatically causes tightness in the posterior pelvic floor.
By improving femoral head positioning and hip ROM (and ideally foot mechanics, too) in the above exercise, we automatically reduce tightness in the posterior pelvic floor making it more responsive, supple and healthy.
